


Cheap telescopes
Who wants a cheap telescope?
Cheap Astronomy recommends an aspirational limit of $300 (AUD), which is considered an investment sufficient to cover all costs required to view some awe-inspiring sights through a telescope and binoculars. This invokes some functional limitations of course.
For under $300, you won’t:
- Do any astrophotography;
- Make a significant contribution to astronomical research (unless you are absurdly lucky); or
- Impress anyone with your gear—apart from other Cheap Astronomers. You only paid how much??
The most common cheap telescopes are ‘Newtonian reflectors’ with the following characteristics:
- A relatively good main mirror;
- Barely adequate magnifying lenses, including a unusable (and unnecessary) Barlow adapter—which is usually thrown away;
- A cheap equatorial mount, prone to wobbling in a lightest breeze—and at the slightest touch of the focus control; and
- A fiddly, difficult to position, finder scope.

For more information on living with a cheap telescope, and a close look at Cheap Astronomy’s own Sky Station 1,
What’s worth looking at through a cheap telescope
A cheap telescope is quite sufficient to view some fabulous sights in the night sky. For example:
- The rings of Saturn and the moons of Jupiter;
- Individual craters on the Moon;
- The Orion and the Carinae nebulae—a.k.a “stellar nurseries”;
- Some open and globular clusters; and
- Binary stars, such as Alpha Centauri A and B.
Getting started
Cheap Astronomy promotes the ‘point and observe’ method as an alternative to a 30 minute lecture on the importance of aligning your equatorial and declination settings. That sort of preparatory fussing about can be useful if you own an expensive telescope and want to accurately track highly magnified objects—and is certainly vital for astrophotography. However, if you just want to get on and observe the universe through a cheap telescope, feel comfortable in skipping this step entirely.
Unfortunately there is no getting around the need to align your finder scope and main scope. If you want to find anything in the night sky you will need both scopes pointing at the same things. This alignment can be done in the daytime using familiar objects on the horizon or at night, perhaps pointing at city lights or the moon. You need something big and easily recognisable as the first step is to find an object on the lowest magnification in the main scope and then try and fix the smaller finder scope on that same object.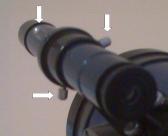
Some quick tips. Remember that the optics of both scopes means that everything appears upside down. The bodgy three screw adjustment found on most cheap finder scopes makes it almost impossible to exactly lock the cross hairs on a target. Don’t worry too much, as near enough is good enough. Make sure you don’t knock your main scope when trying to align the finder scope. Keep double checking that you are still on target as you go. It’s a five minute job, but a very long five minutes if you first gathered together a bunch of spectators expecting instant telescopic gratification.
With this step achieved you are on your way, at least until you bump the finder scope and suddenly find it’s no longer pointing at the same things as your main scope. Go back two paragraphs.
Finding a star-like object in the finder scope can be challenging, since most things up there are star-like and they will all be upside down. You might consider starting with something easy like the Moon and use that opportunity to get a feel for how the fine controls of the telescope work. When you do decide to go hunting for something smaller, get used to keeping both eyes open when you look through the finder scope. You should experience a kind of optical illusion where the finder scope cross hairs become super-imposed over what you are seeing through your unassisted eye. This makes it a lot easier to direct the finder scope in the right direction. When you get close, the magnified object should appear in the finder scope allowing you to do more fine tuning. All going well, you should then have the same object visible in your main scope and can start calling yourself a Cheap Astronomer.